Showing posts with label Sewing. Show all posts

Sunday, December 30, 2012

Butterick 3714 -- Project Number Two -- Church Dress for Amber


Butterick 3714


Things I Needed for this Project:
B3714
  • 3 Yards Poly Satin Fabric (Purple)
  • 2 1/4 Yards Lining Fabric
  •  2 1/3 Yards of 72" Tulle
  • Iron on flower appliques
  • Invisible Zipper


Things I Learned:
  • If you are trying to sew a long length of tulle, roll one end of it up.
  • The colored side of the tracing paper is the side that goes on the fabric.  Unless, of course, you want fancy colored patterns.
  • Satin isn't so scary to sew on -- I hardly noticed a difference between that and the cotton I worked with on my apron.
  • How to sew a rolled hem.  I practiced and practiced at creating a blind hem, but I just could not do it correctly.  So I decided to try a rolled hem instead, and I must say that I loved it!  
  • How to install an invisible zipper.  Yes!  An Invisible Zipper (this is my first zipper install of any kind)!   I won't lie, it was pretty scary.  But my survival instincts kicked in, and luckily I made it out alive and unscathed (but I think I might have post traumatic stress disorder).  
  • How to install an invisible zipper with a regular zipper foot.  

Lessons Learned the Hard Way:
  • Read the back of the pattern completely, that way you don't realize that you are missing the lining fabric for the dress on the day you start your project.
  • I cannot get it through my stubborn head that you pin two fabrics on top of each other when you are sewing them together.  I keep finding myself trying to pin fabric side-by-side.  I spend a lot of time doing this, wind up frustrated, and then realize that it doesn't look like it should.  Then I smack myself on the forehead, unpin everything, and pin in correctly in about 30 seconds (which is 1/20th of the time I spent doing it the wrong way).
  • Cats absolutely love it when you try to iron a fabric that is prone to wrinkling that is much too large for your ironing board.  She kept attacking the bottom of it.  
  • The Singer Quantum 9960 comes with a ton of zipper feet; unfortunately an invisible zipper foot isn't one of them!
  • I am no good at cowls.  Actually, that is an understatement.  I am terrible at cowls.  I don't think I'll attempt another cowl for quite some time. On the plus side, the dress doesn't look too bad with the cowl missing.  In fact I think it was just dress B (dress A was the one I originally aimed to make).  
  • When I sew, all my first instincts are always wrong.  Sewing just seems so unnatural to how I think things should work!  Fabrics sewn on top of one another, zippers sewn on opposite sides and upside down and all kinds of non-sense.  If I ever get this sewing thing down, I'm going to be out of whack with the rest of the world. 

And so it Begins ...

The pattern told me to start by creating the cowl for the dress.  The cowl is the odd thing hanging from the gold-colored dress in the pattern picture.  After looking at the instructions for the cowl, I decided to try something less difficult.  This was, after all, the very first piece of clothing I have ever attempted to sew.  I needed to start off easy.

I decided to start with the lining of the dress, that way I had a chance to practice before working with the actual fabric.  I must say that the cutting instructions were very difficult for this beginner.  In all my previous experience (one whole project), all the pattern pieces were laid on the fabric at the same time and then cut.  Well that wasn't the case here.  Here I had to cut fabric, reposition, cut more, and in some cases I had to fold my already cut fabric.  Eventually I did wind up with all the pieces I needed, which is somewhat of a miracle.


So how does this thing go together again?  At first I tried to pin the sides of the fabric together (see Lessons I Learned the Hard Way), before finally remembering to pin them on top of one another. 


I have a thing resembling a skirt.  Yay!


Tulle.  I quickly learned to dislike this stuff.


Tulle was interesting to sew on, to say the least.  Fortunately it wasn't too difficult as long as I went slowly.  Because I am such a genius, it only took me like 15 minutes to figure out that the tulle would be easier to sew if I rolled the other end.  Duh.  Oh well, another lesson learned!

Well, at least one of the lines is straight!


I think I was getting ready to sew a gather along the top of the tulle when I took this picture.  I was getting very frustrated trying to keep the tulle (like 2 yards of 72" width) together and straight.  I remember wishing that I had paperclips (which I have since added to my sewing box).  Finally I asked my husband if he had any small clamps, and he came back with these.  It helped tremendously.


And now we have one pretty, bunched ruffle.  This was my first experience with gathering, and all-in-all it worked pretty well.


I had a heck of a time getting the ruffle to pin evenly around the base of the skirt lining.  Finally I brought the clamps back, and that helped me to get it even.  It also might have helped if I had transferred those markings to the tulle in the first place.  Oops :-)


There, now that sucker is pinned on.


The ruffle is sewn on.  Score!


Now it's time to get into the real stuff -- 3 yards of purple poly satin.  FYI, Hobby Lobby sells this for $2.99 per yard as it's regular price.  Combine that with a 40% off one item coupon (there is always one of those available), and you have this gorgeous material for only $1.80 per yard.  And there are so many gorgeous colors to choose from!  Now, if only there were a magic trick to ironing 3 yards of poly satin at a time without it constantly falling off the ironing board.  And I think there's a cat in the bottom of that fabric there somewhere. 


I finally get to experiment with tracing pattern markings!  Lesson learned -- the colored end of the tracing paper is supposed to go face down.


There, that's more like it.  I figured out the my tracing wheel worked well for for transferring these marks.


See?  I am oddly proud of my pretty yellow marks.
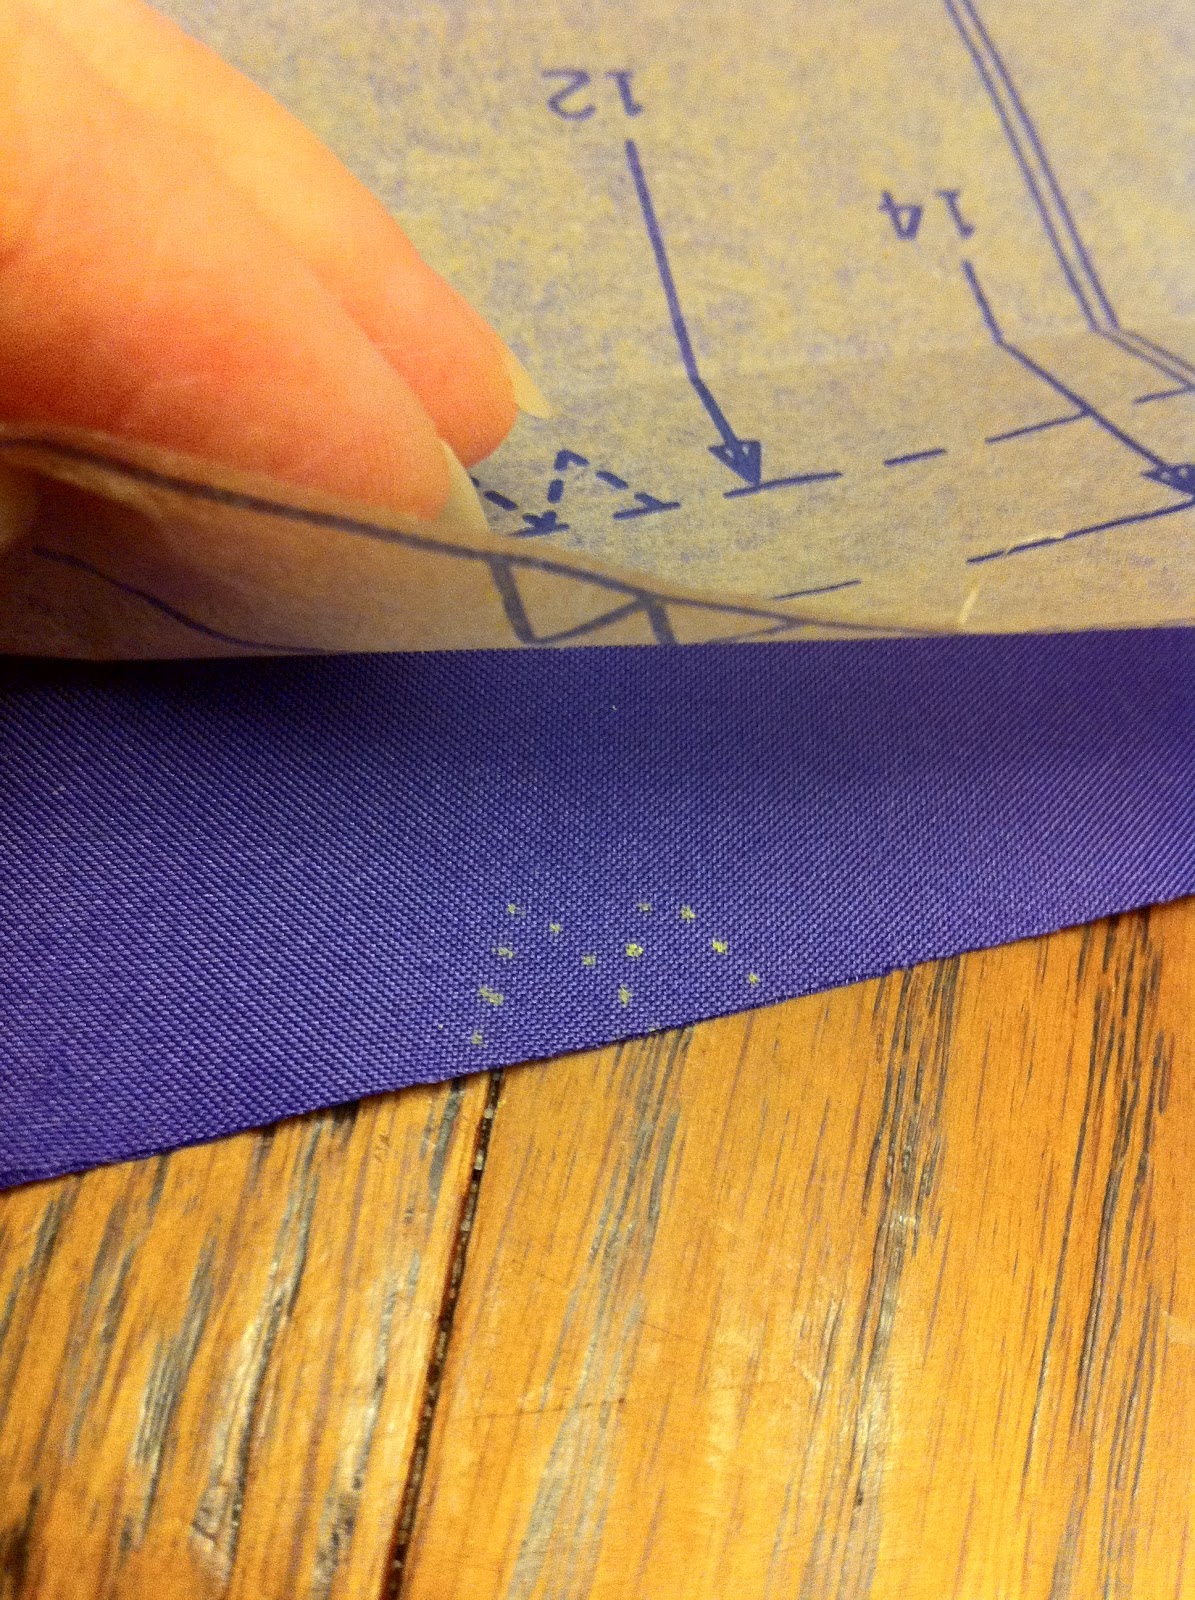

I learned (after reading a tip elsewhere) to transfer these circles by placing a pin through the hole and then marking against it with chalk.  Now if only I knew what I was supposed to do with those dots.


Hmm... odd, two sided triangles?  What on earth does that mean?


I've got a partial skirt going on.  The excitement is building.


Look!  My daughter can even wear it if she holds it up with her hands ...


Ugh, the dreaded cowl.  Maybe I would have done better with it if I knew what the dots and triangles were for.


It did not turn out well at all.  I made an executive decision to leave it off.


We have a top!!


I was supposed to do the zipper next, but the thought of that terrified me.  So I headed for the hem next.  I tried and tried to get a blind hem to work, but in the end I just couldn't.  So I learned the technique for a rolled hem.


LOVE the rolled hem!


Uh-oh.  Zipper time.  And not just any zipper, but an INVISIBLE one!  The pattern called for a regular zipper, but no way was I sticking a regular zipper in this dress.  I was on my own for figuring out how to make this work.

I watched a thousand and two tutorials on You Tube.  I browsed blog after blog.  I looked in all my sewing books.  But no matter what I did, the whole zipper thing just didn't seem right to me.  I kept pinning it into place to test how it would zip, and it never worked correctly.

Finally I figured out what my problem was.  I kept pinning the left side of the underside of the zipper (see? just saying that is confusing) to the left side of the dress opening, because that was the side of the zipper that seemed natural to pin on.  But noooo ... all my first instincts are wrong!  Once I pinned the right side (as in, the literal right side and not the top facing side) of the upside-down zipper to the left side of the fabric (can you blame me for being confused), then it all finally worked out.


Shoot, small problem -- apparently I don't have an invisible zipper foot!  But at this point I couldn't go to the store.  So for my very first invisible zipper -- coincidentally my very first zipper at all -- I had to make due with my regular zipper foot.  I sewed slow and as close to the zipper as I could get.


One side attached -- no going back now!


So now I pinned the left side of the upside-down zipper to the right side of the fabric.  And by right side, I mean both the facing-up side and the literal right side of the opening in the back.  If I ever write instructions for installing an invisible zipper, I'm calling the right and left sides of the zipper and fabric something else entirely!


Yay, it is on!  Unfortunately when I zipped it up it wasn't quite right -- I could see too much of the zipper.  My loving husband figured out that I hadn't sewn close enough to the zipper on the other side (as shown below).  I went back over it with my regular zipper foot and got as close as I could.


That was the last step for sewing!  After that I ironed on a couple appliques (one on the stomach, the other on the left shoulder, hidden by her hair).  On the plus side, I finished this at about 10 pm on a Saturday night -- just in time for church the next day.


And the back -- a little bunching from the zipper, but overall I am pretty happy with it!


Amber is ready for church the next day.  Like childbirth, all the pain was worth it in the end!

Sunday, August 26, 2012

Mary Mulari Reversible Wrap Front Apron -- My Very First Project!

Things I Needed for this Project:
  • One Yard Purple Cotton Fabric
  • One Yard Black Apron Patterned Fabric
  • Wrap Front Apron Pattern (by Mary Mulari Designs)
Things I Learned:
  • Fabric is supposed to be folded before laying out pieces to cut on.  My pattern did NOT tell me this.  Thankfully I was armed with the Sew Everything Workshop book!
    • Fold the right sides together
      • Wrong side = side you don't want to see of the pattern
      • When something is placed against the fold of the fabric, it will be one continuous piece when you cut it.  Otherwise you will get two pieces of the same pattern
  • Pinning is my friend. The layout of the pattern on the fabric was a very tight fit, so pinning helped me to ensure I didn't accidentally cut into another piece's space.  It also allowed me to get a much straighter cut than I could do by tracing and cutting (I fail in basic drawing and straight edge skills!).
  • Working with a reversible piece of clothing is like getting a whole do-over project.  For each task I started with the purple fabric before doing the same thing on the black apron piece.  The result is one side that is fit for cooking for my family, and the other side that has fewer imperfections and will be worn when I'm cooking for guests.
  • Reading a pattern is kind of like reading the bible -- you often have to re-read passages for things to make sense, and the more you read, the better you get at deciphering the meaning.  Now if only the Holy Ghost were to give me special insight on the meaning of the patterns, I'd be golden!    
Lessons Learned the Hard Way:
  • I have never been burned by an iron before this project.  Pressing those 1/4" seams led to countless steam encounters with my fingers!  From now on I just might pull out my thermal glove (for my hair curler).  "Might" is the keyword here -- I probably won't pull it out until after I burn myself a few times over.
  • When I first tried to press the seams, I tried to measure and mark around where the seam would go.  I realized later this was silly, since I couldn't see the marks on the fabric when folding it.  It worked much better to iron while using my seam gauge.  I would measure, iron a bit, measure again, etc .. until I was done.  
  • I thought the smallest seam allowance I could get was by lining up the fabric perfectly with the presser foot.  Well I was wrong!  After I sewed my first pocket on I realized that the stitch was too far left to reach the pressed hem.  I learned this on the pockets, so my solution was to sew a thin straight stitch around the outside of the pocket getting as close I could.  I then repeated on the other purple pocket.  Now it looks like I knew what I was doing and was trying to be decorative or something. 
  • Pay close instructions to pinning instructions for little things like ties and hooks.  I almost sewed the ties into the apron.  Luckily I caught the mistake while I was giving the final pinning job a one-over.  What I didn't catch was my mistake with the hook on the back.  I was dismayed to find the hook inside the apron (and the rough edges on the outside) when I turned it inside out!  I still don't know how exactly I did that.  I turned the apron back inside out, cut the hook off, and just sewed it on the outside of the apron.  It doesn't look the best, but it works and no one will see it anyways.
  • Watch out when trimming seam allowances!  I cut into the allowances on my ties -- including the entire bottom seam on one of them.  I had to go and stitch around the outside on the bottom and over the random spots I cut open.
  • Even simple patterns take a lot of work, especially when you have no clue what you're doing to begin with.
  • If you have a cat, he/she will have an uncanny attraction to your entire sewing project.  It doesn't matter if you have a hundred pins sticking out of the fabric, because apparently kitties are immune to pin sticks and will lie on the work in progress anyway.
  • When you drop a pin on the floor, the absolute easiest way to find it is to walk around barefoot.
Things I Still Need to Learn:
  • How and when to transfer markings to my fabric.  There were only a couple places with markings on this pattern, but I still found myself with slight issues trying to figure out where to place the pockets when left only with the fabric. 
  • How to press a seam.  I pressed each side of the seam, but then couldn't get it back open to press it flat.  The instructions said to trim the seams (which were only 1/4 inch to begin with) and then press.  But the extra fabric around the seams was so small I couldn't open it back up.  Should I press before trimming in the future? 
    • Since I wrote this, I realized that I had it all wrong.  When it said press each side of the seam allowance, I thought this meant that I had to press the seam first to one side, then to the other, then open it.  I now (silly me) realize that pressing the other side meant to turn the fabric over.  Oops!  I can't wait to press a seam the correct way!

Steps to Prep:
  1. Pre-washed the fabric.  Washed these items separately, since I feared one or both of these might bleed the first time.  I tumbled dry on low, which is how I dry any of my cotton made clothes.
  2. Ironed the fabric.  Whew!  Now it looks like new again.  I was worried when I first pulled it out and it looked kinda ... well, crappy.
Here is my pattern, fabric and reference book (The Sew Everything Workshop):

Laying out the fabric for one side of the apron.  I always did the purple side first.  It was my "practice" side.  The black apron fabric is my "I'm cooking for company!" side.

Ready, Set ... Cut!

Wow, I have pieces of ... something.  These go together somehow, right?!

Time for my "I'm having company!" side.  At least I realized enough to make sure the pattern would face the correct direction!  Well, I was pretty certain I had it right.  I had a notion of which way it should go, and kept my fingers crossed.  It seemed to work for me!

Hmmm.... there's something extra here, and I can't quite put my finger on what it is that doesn't belong ...

My very first pockets.  I had to press in the edges all around and then stitch the top of the pockets before adding them to the project.

Here you can see my mistake -- I sewed the original stitches too far past the seam (original stitches are the zigzag ones).  So I then went back and carefully stitched around the edge.  I was pleased with the outcome, even if it was because I made a mistake.  Looks like I probably should have clipped that bottom left corner, though.  Funny how I didn't even notice until I looked at this picture!

Here's my do-over set of pockets. 

You can't see the stitching as well below because it's black on black.  I did the same thing that I did on the purple side (only on purpose, to make it match!).  The only difference is I first did the straight stitch along the side before adding the zigzag stitching. 

At this point in the project I had just sewn the ties together.  I then had to figure out how to turn them right side out with just the tops left open.  This proved to be quite a challenge until I finally figured out a method.  The method involved putting my finger in the tie and gripping it with the tip, then pulling the fabric with the other hand.  Since I knew I wouldn't be able to explain this well enough, I shot a quick video while doing it.  Not that it's very helpful, but hopefully it will give you an idea.

And here's another lesson learned.  Turns out I accidentally clipped the seam while trimming the end. The end result was having two open ends!  Oops!  I didn't bother turning it back inside out.  Instead I just nonchalantly stitched the end together and then pretended not to notice on the finished project.


And here are my completed ties, black on one side and purple on the other.  This was a very exciting point for me, because it was the first item that actually resembled something -- the rest were all in pieces.

Yikes, this was scary.  What was this thing called a yoke, and how exactly was it supposed to fit into my project?  Turns out the yoke was the piece that went behind my neck, and it was to be attached to each front piece of the apron.  To make matters worse, I somehow thought that I had to pin all layers of fabric together -- so I initially pinned both fabrics together into a six piece jumble.  Luckily I re-read the instructions and realized my blunder before sewing.  It was much more manageable as a three piece jumble! 

I sewed the yoke to the purple fabric, and then sewed the black yoke to the black fabric.  Then it was finally time to sew the two together.  At this point it was both scary and exciting.  This was make it or break it, and I was up to the challenge.  Note how the ties are actual inside the two pieces.  Here is where I almost messed up.  It was so foreign to me that I should sew something inside that I almost completely screwed this one up.  Unfortunately, I did not realize the same with the hook on the back of the yoke and had to fix that later.

The final instructions were to finish it off with some topstiching.  Here I did have a few issues -- I had to find a stitch that would look good on both the front and the back of the fabric.  After trying out many different stitches, I chose the one below.  I also learned a very good tip -- to load the purple thread into the bottom and the black thread on top.  This totally eliminated the dilemma I was having -- which color to choose for the topstitching.  I didn't have to choose at all!
My favorite (do-over) side.  I really wish I had put on some makeup and had my hair done, but at this point it was close to midnight, so I chose to bare all for sake of an immediate photo. 
Wrap Front Apron  (Mary Mulari Designs)

Here is my "starter" side.  This is the side I will use while saving the black side from stains.  A few minor imperfections, but overall I'm quite happy with the result of my very first sewing project!
Wrap Front Apron  (Mary Mulari Designs)